> ## Documentation Index
> Fetch the complete documentation index at: https://docs.soloent.ai/llms.txt
> Use this file to discover all available pages before exploring further.
# Your First Day with SoloEnt
> From download to installing your first plugin, in the order a new user actually does it
This guide follows the order a new user actually works through. Budget about 15 minutes.
## Step 1: Download
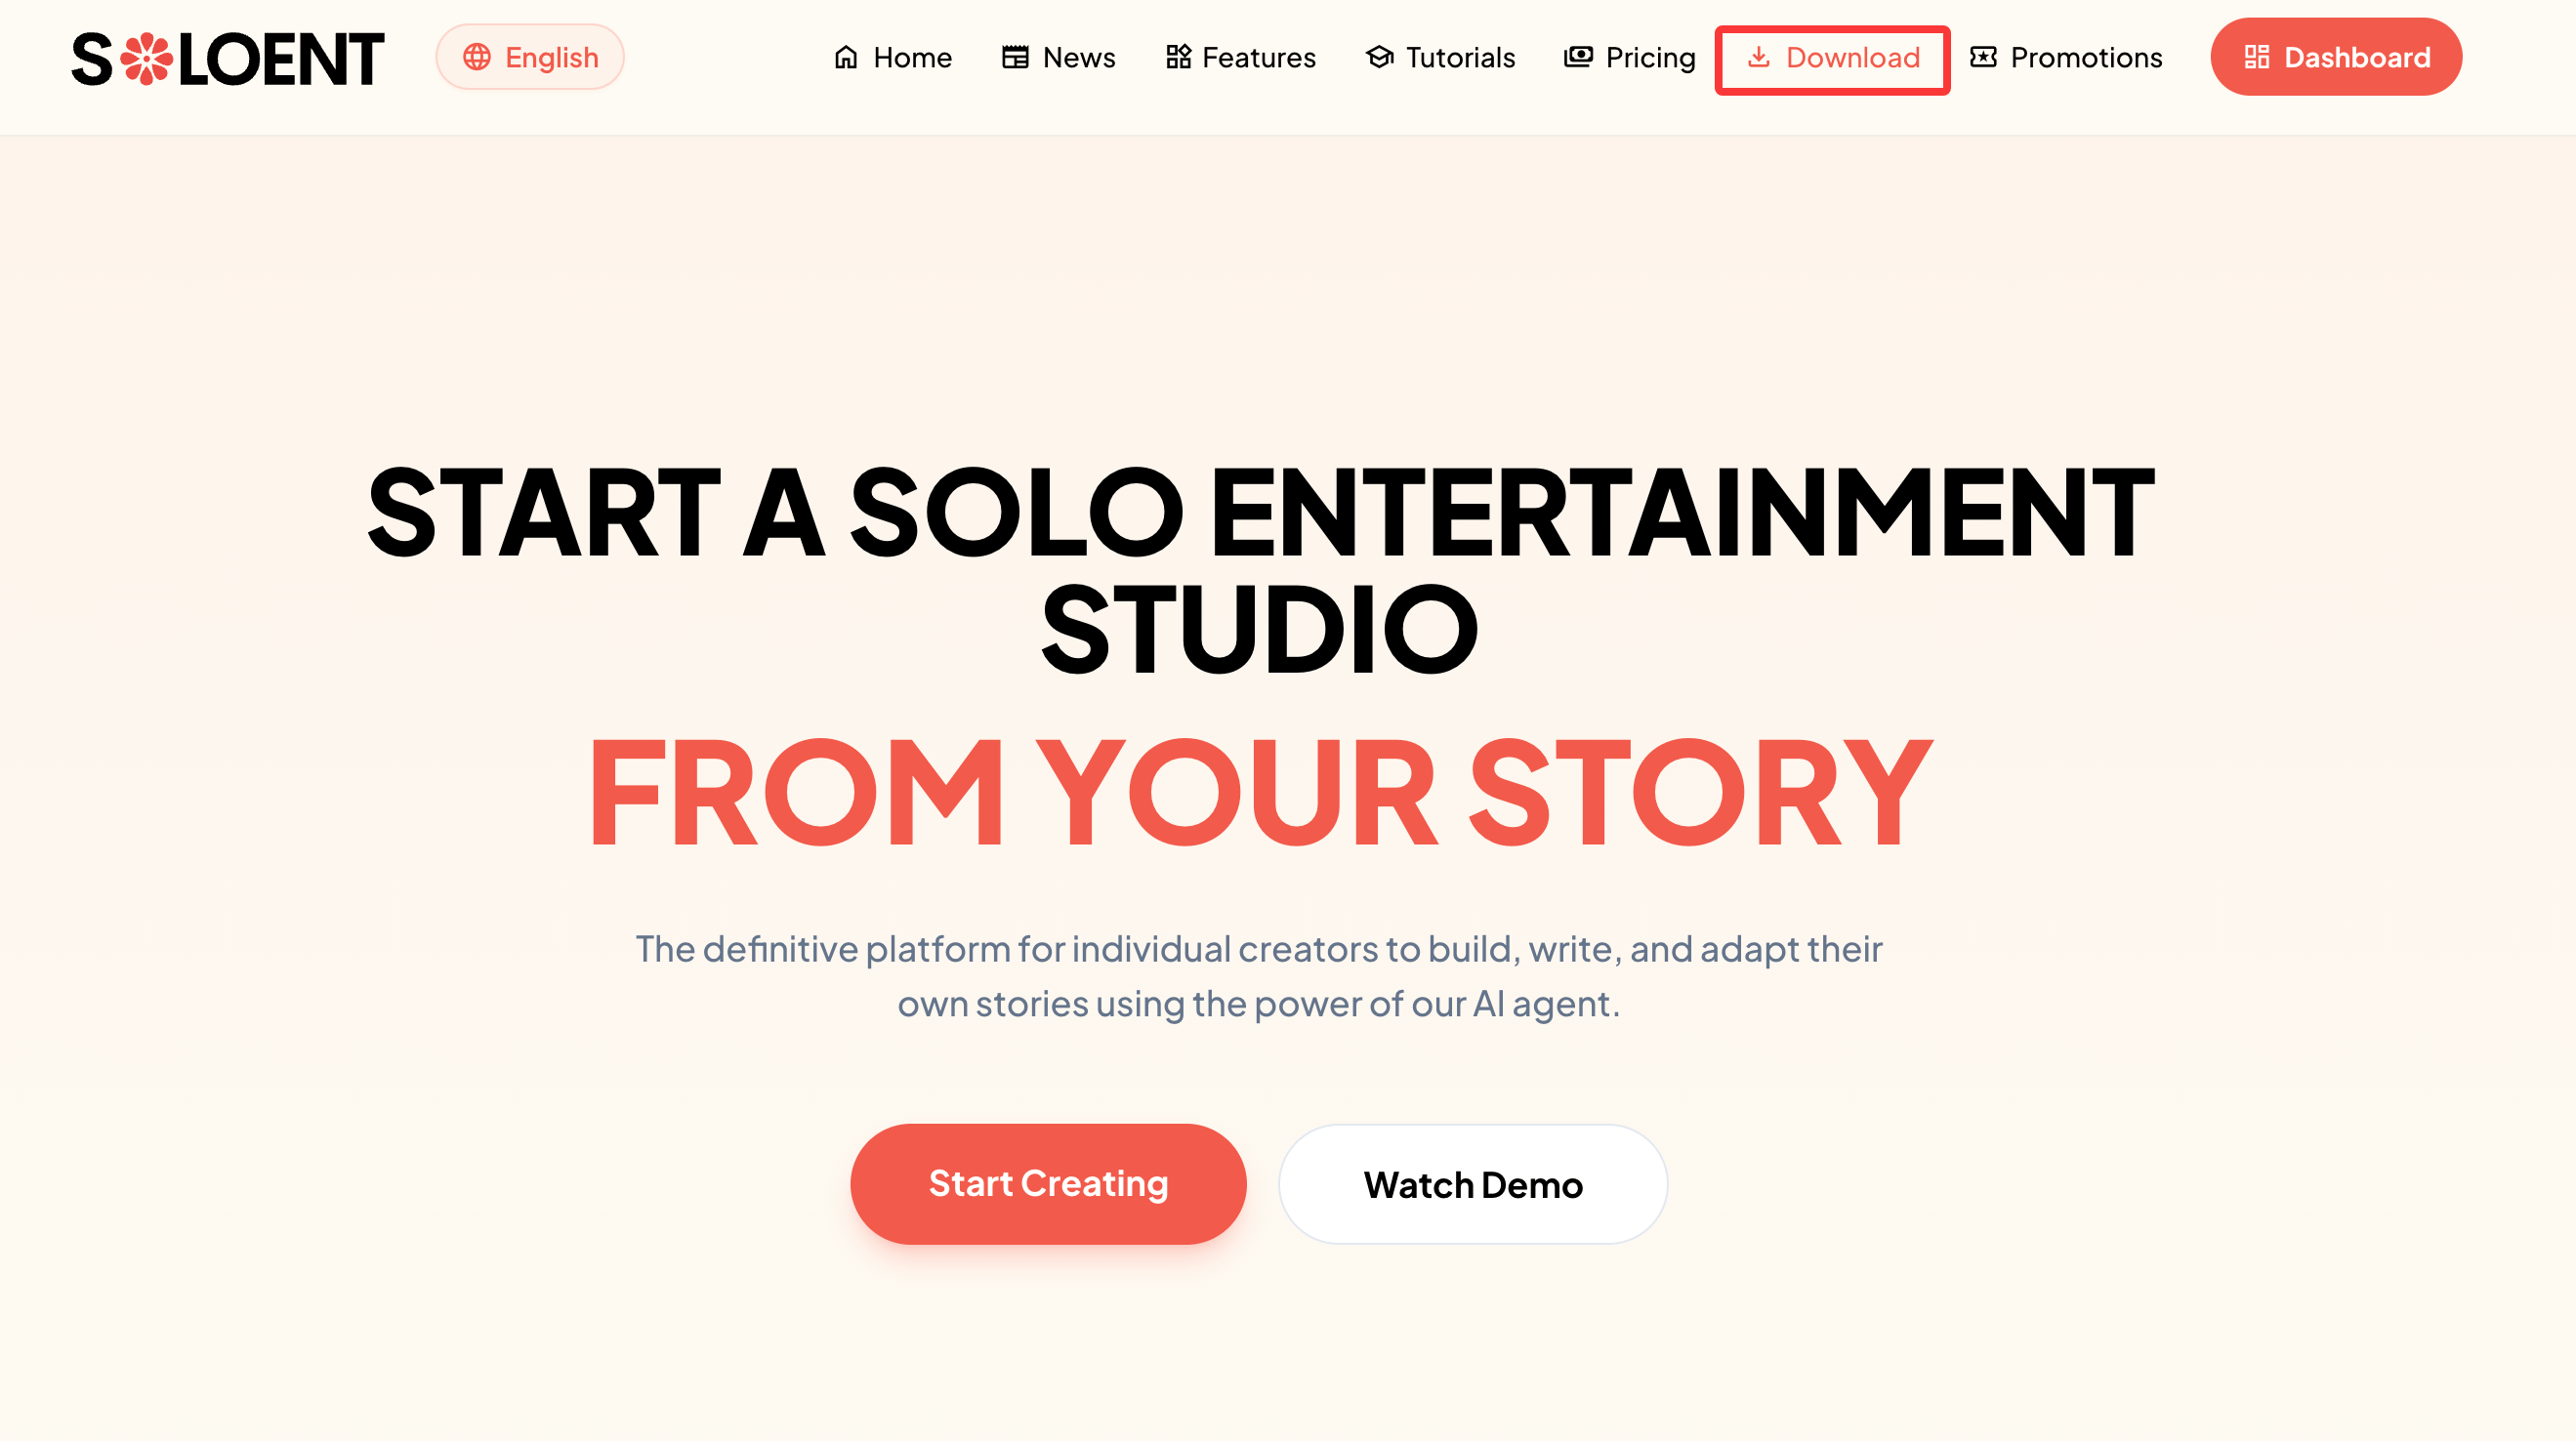
Go to [soloent.ai](https://soloent.ai/), click **Download** in the top-right corner, and pick the build for your machine.
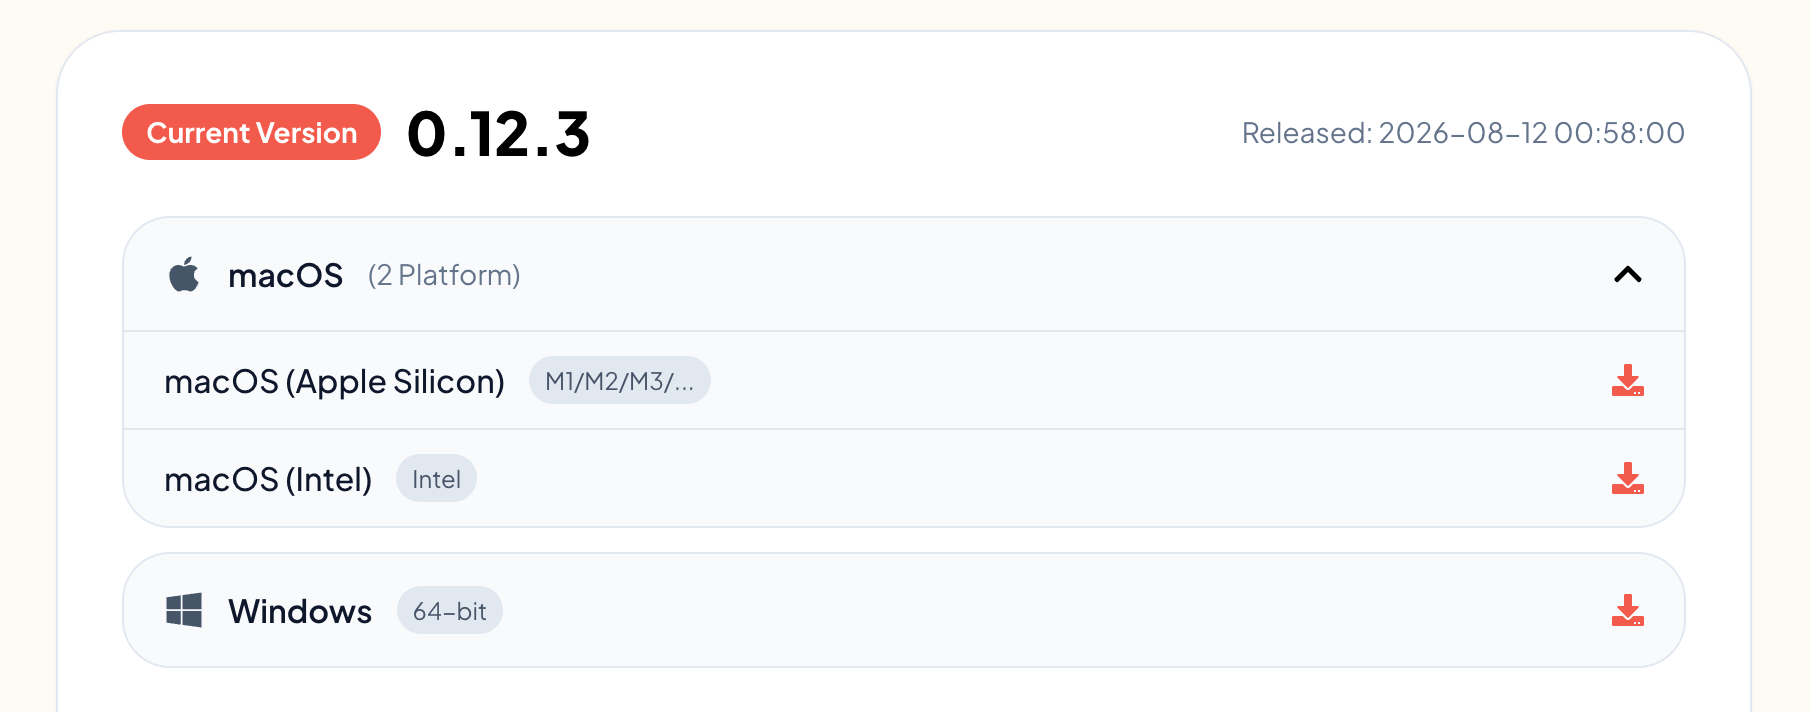
 Windows users: check your chip architecture. Mac users: check whether you need the Apple Silicon or Intel build.
 ## Step 2: Install
### Windows
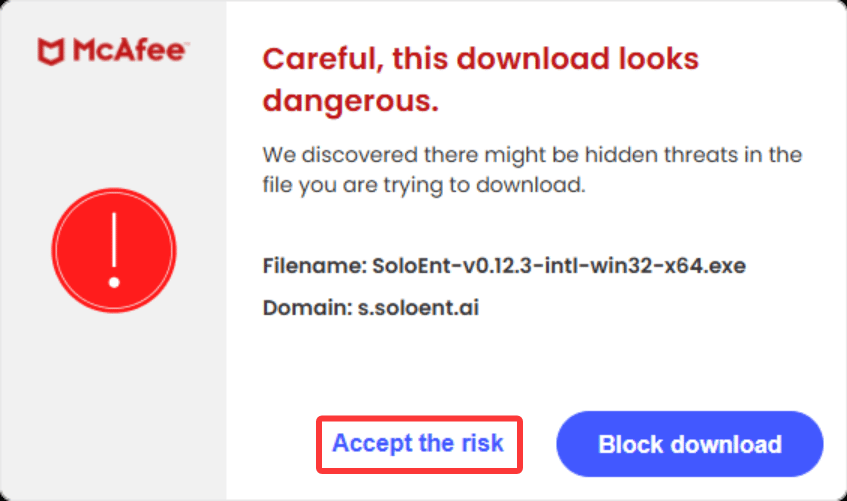
You may see a security warning during installation. This is because SoloEnt is not distributed through the Microsoft Store — the installer itself is safe. Choose **Trust**, **Accept**, **Keep**,or **Run** to continue.
Make sure no older SoloEnt window is still running before you install, or the installation will fail.
## Step 2: Install
### Windows
You may see a security warning during installation. This is because SoloEnt is not distributed through the Microsoft Store — the installer itself is safe. Choose **Trust**, **Accept**, **Keep**,or **Run** to continue.
Make sure no older SoloEnt window is still running before you install, or the installation will fail.
 ### Mac
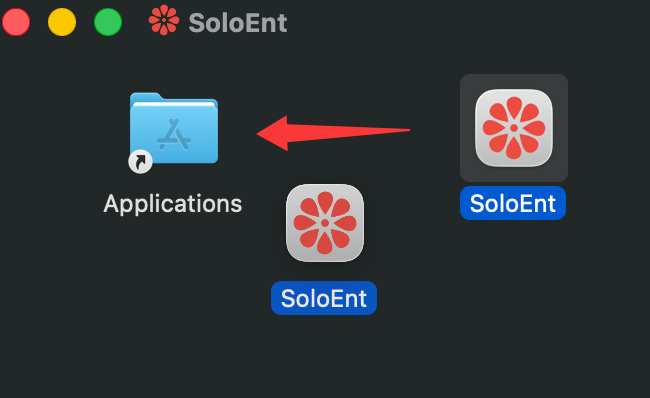
Double-click the installer and drag the app into your Applications folder.
### Mac
Double-click the installer and drag the app into your Applications folder.
 ## Step 3: Set your language
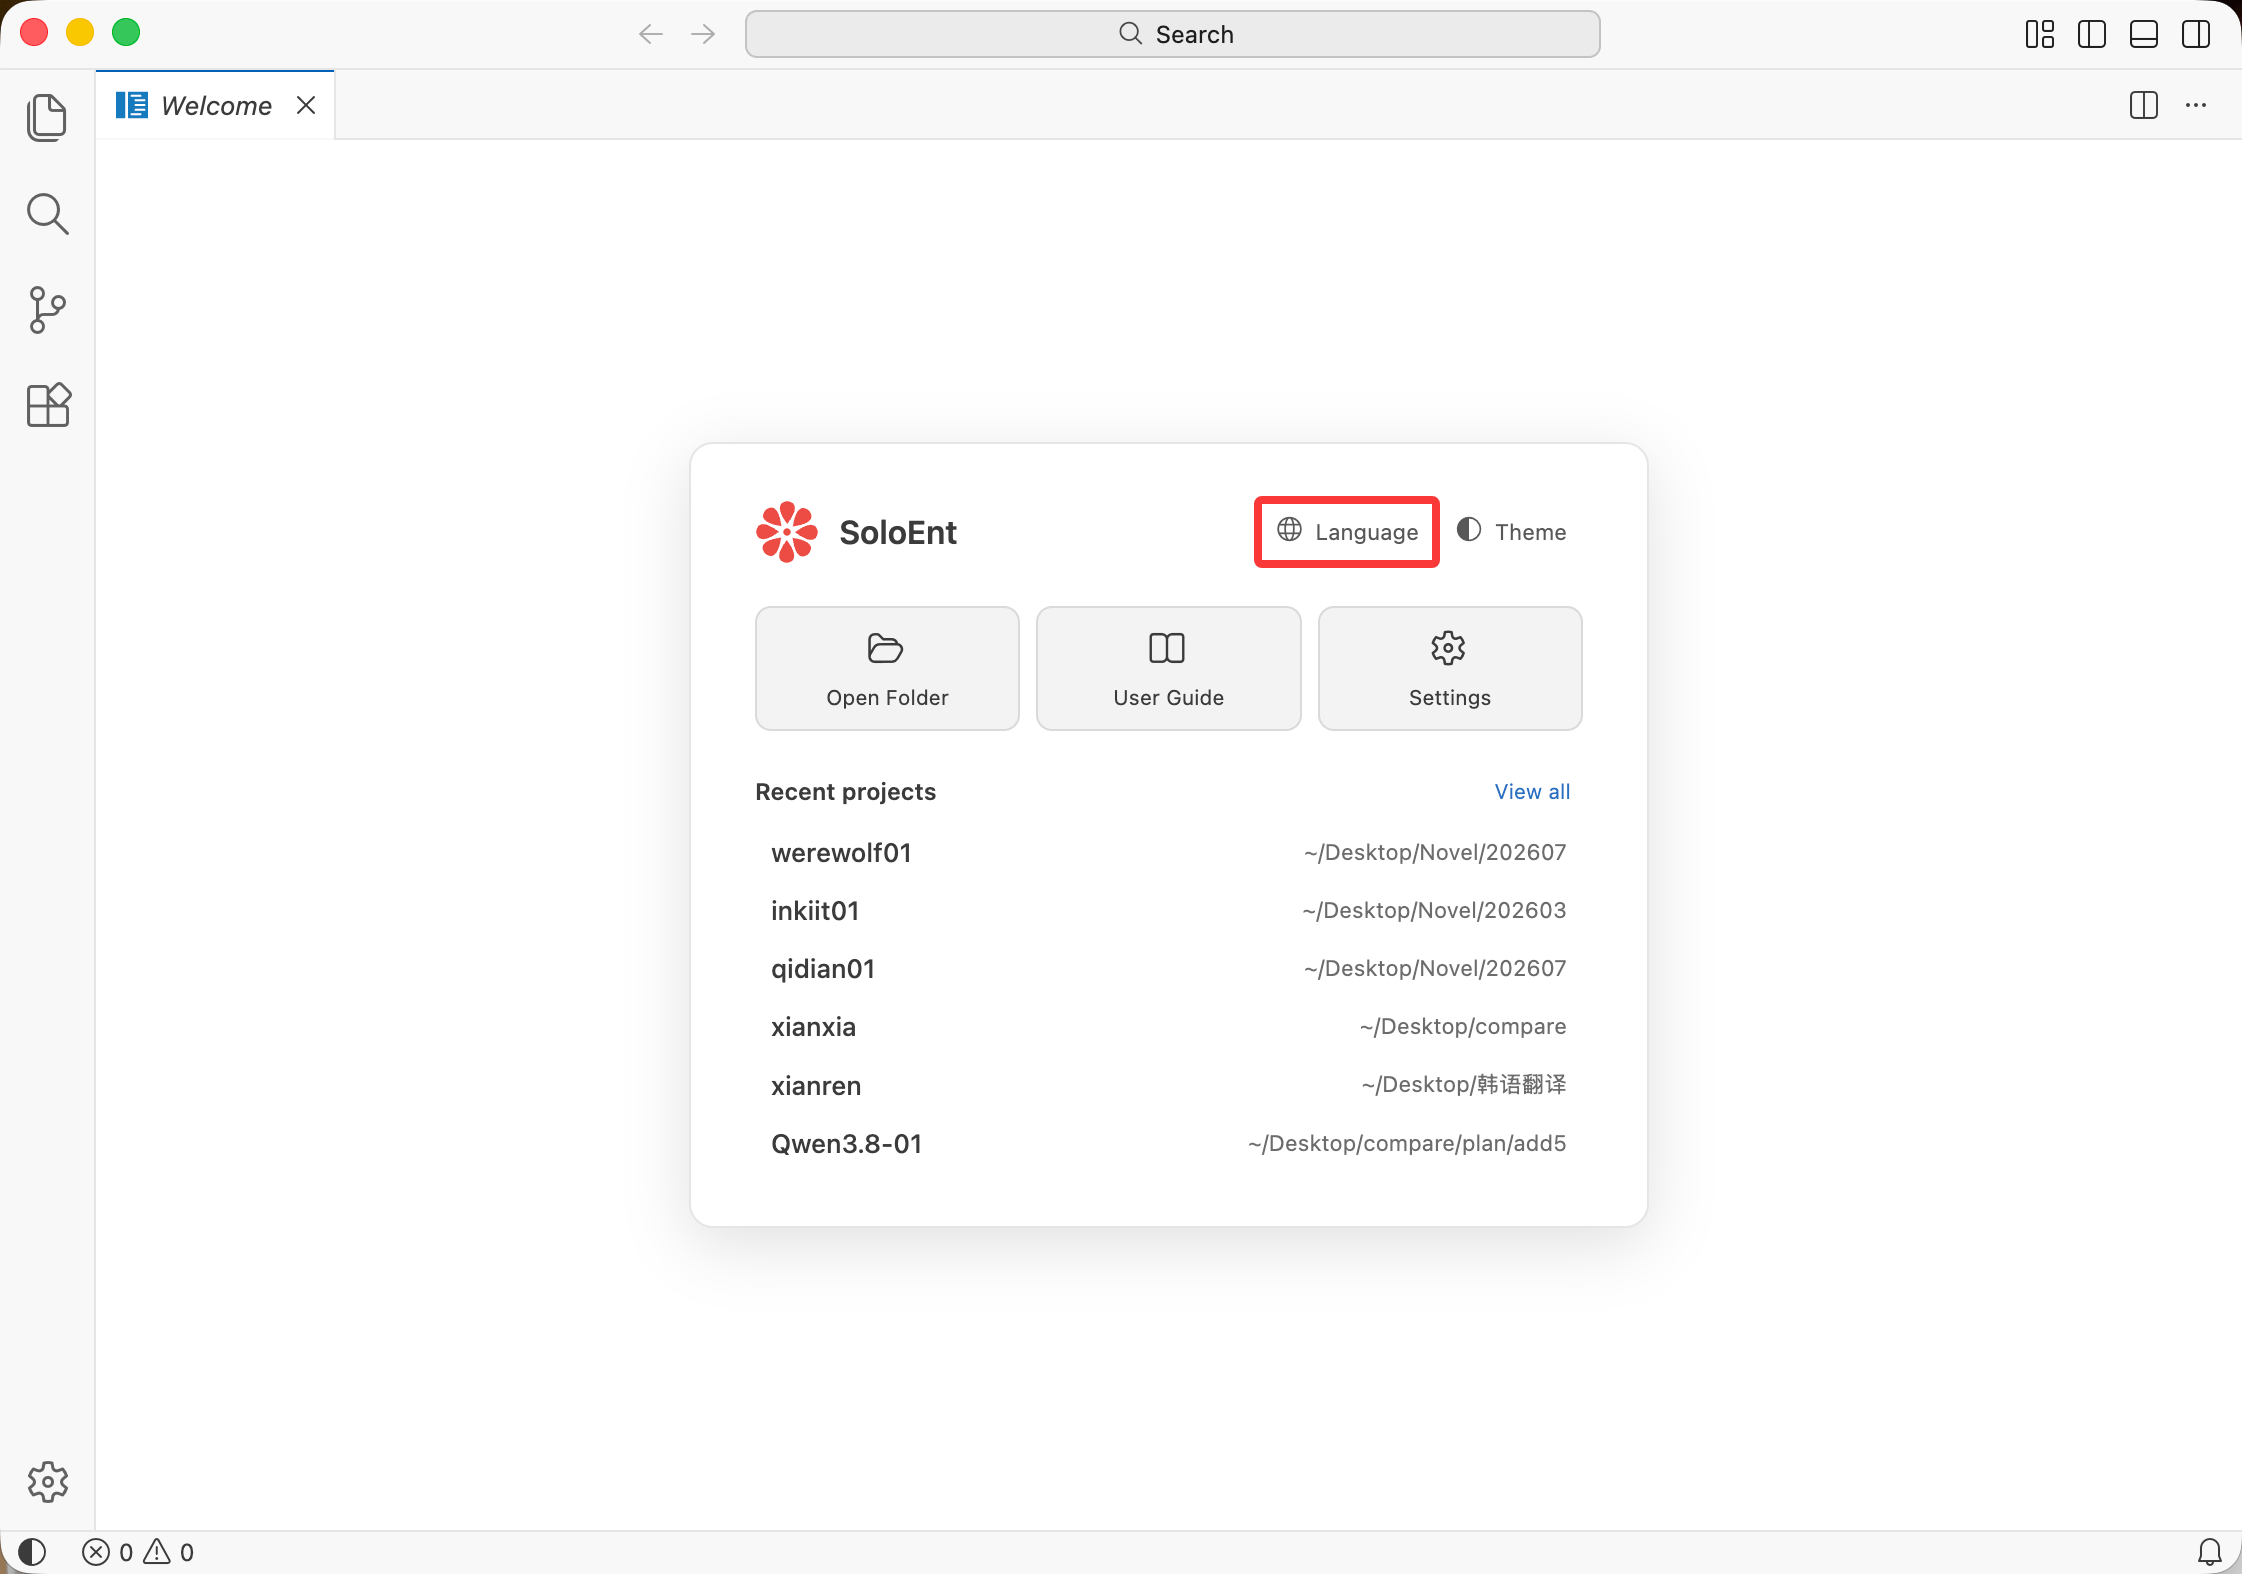
The first time you open SoloEnt, the welcome page has a language switcher in the top-right corner.
## Step 3: Set your language
The first time you open SoloEnt, the welcome page has a language switcher in the top-right corner.
 Once you are in the app, the settings icon in the top-right of the Agent panel gives you two separate options:
* **Preferred Language** — the language the AI replies in
* **Interface Language** — the display language of the Agent panel itself
Once you are in the app, the settings icon in the top-right of the Agent panel gives you two separate options:
* **Preferred Language** — the language the AI replies in
* **Interface Language** — the display language of the Agent panel itself
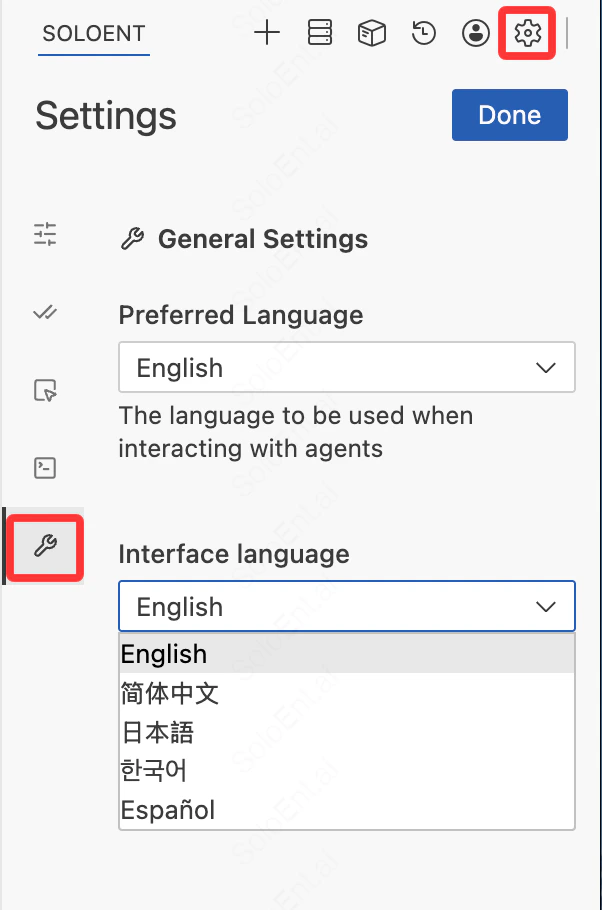 These two are independent, so an English interface with replies in another language is a valid combination.
## Step 4: Pick a color theme
If you write for long stretches, start with a theme that is easy on the eyes.
These two are independent, so an English interface with replies in another language is a valid combination.
## Step 4: Pick a color theme
If you write for long stretches, start with a theme that is easy on the eyes.
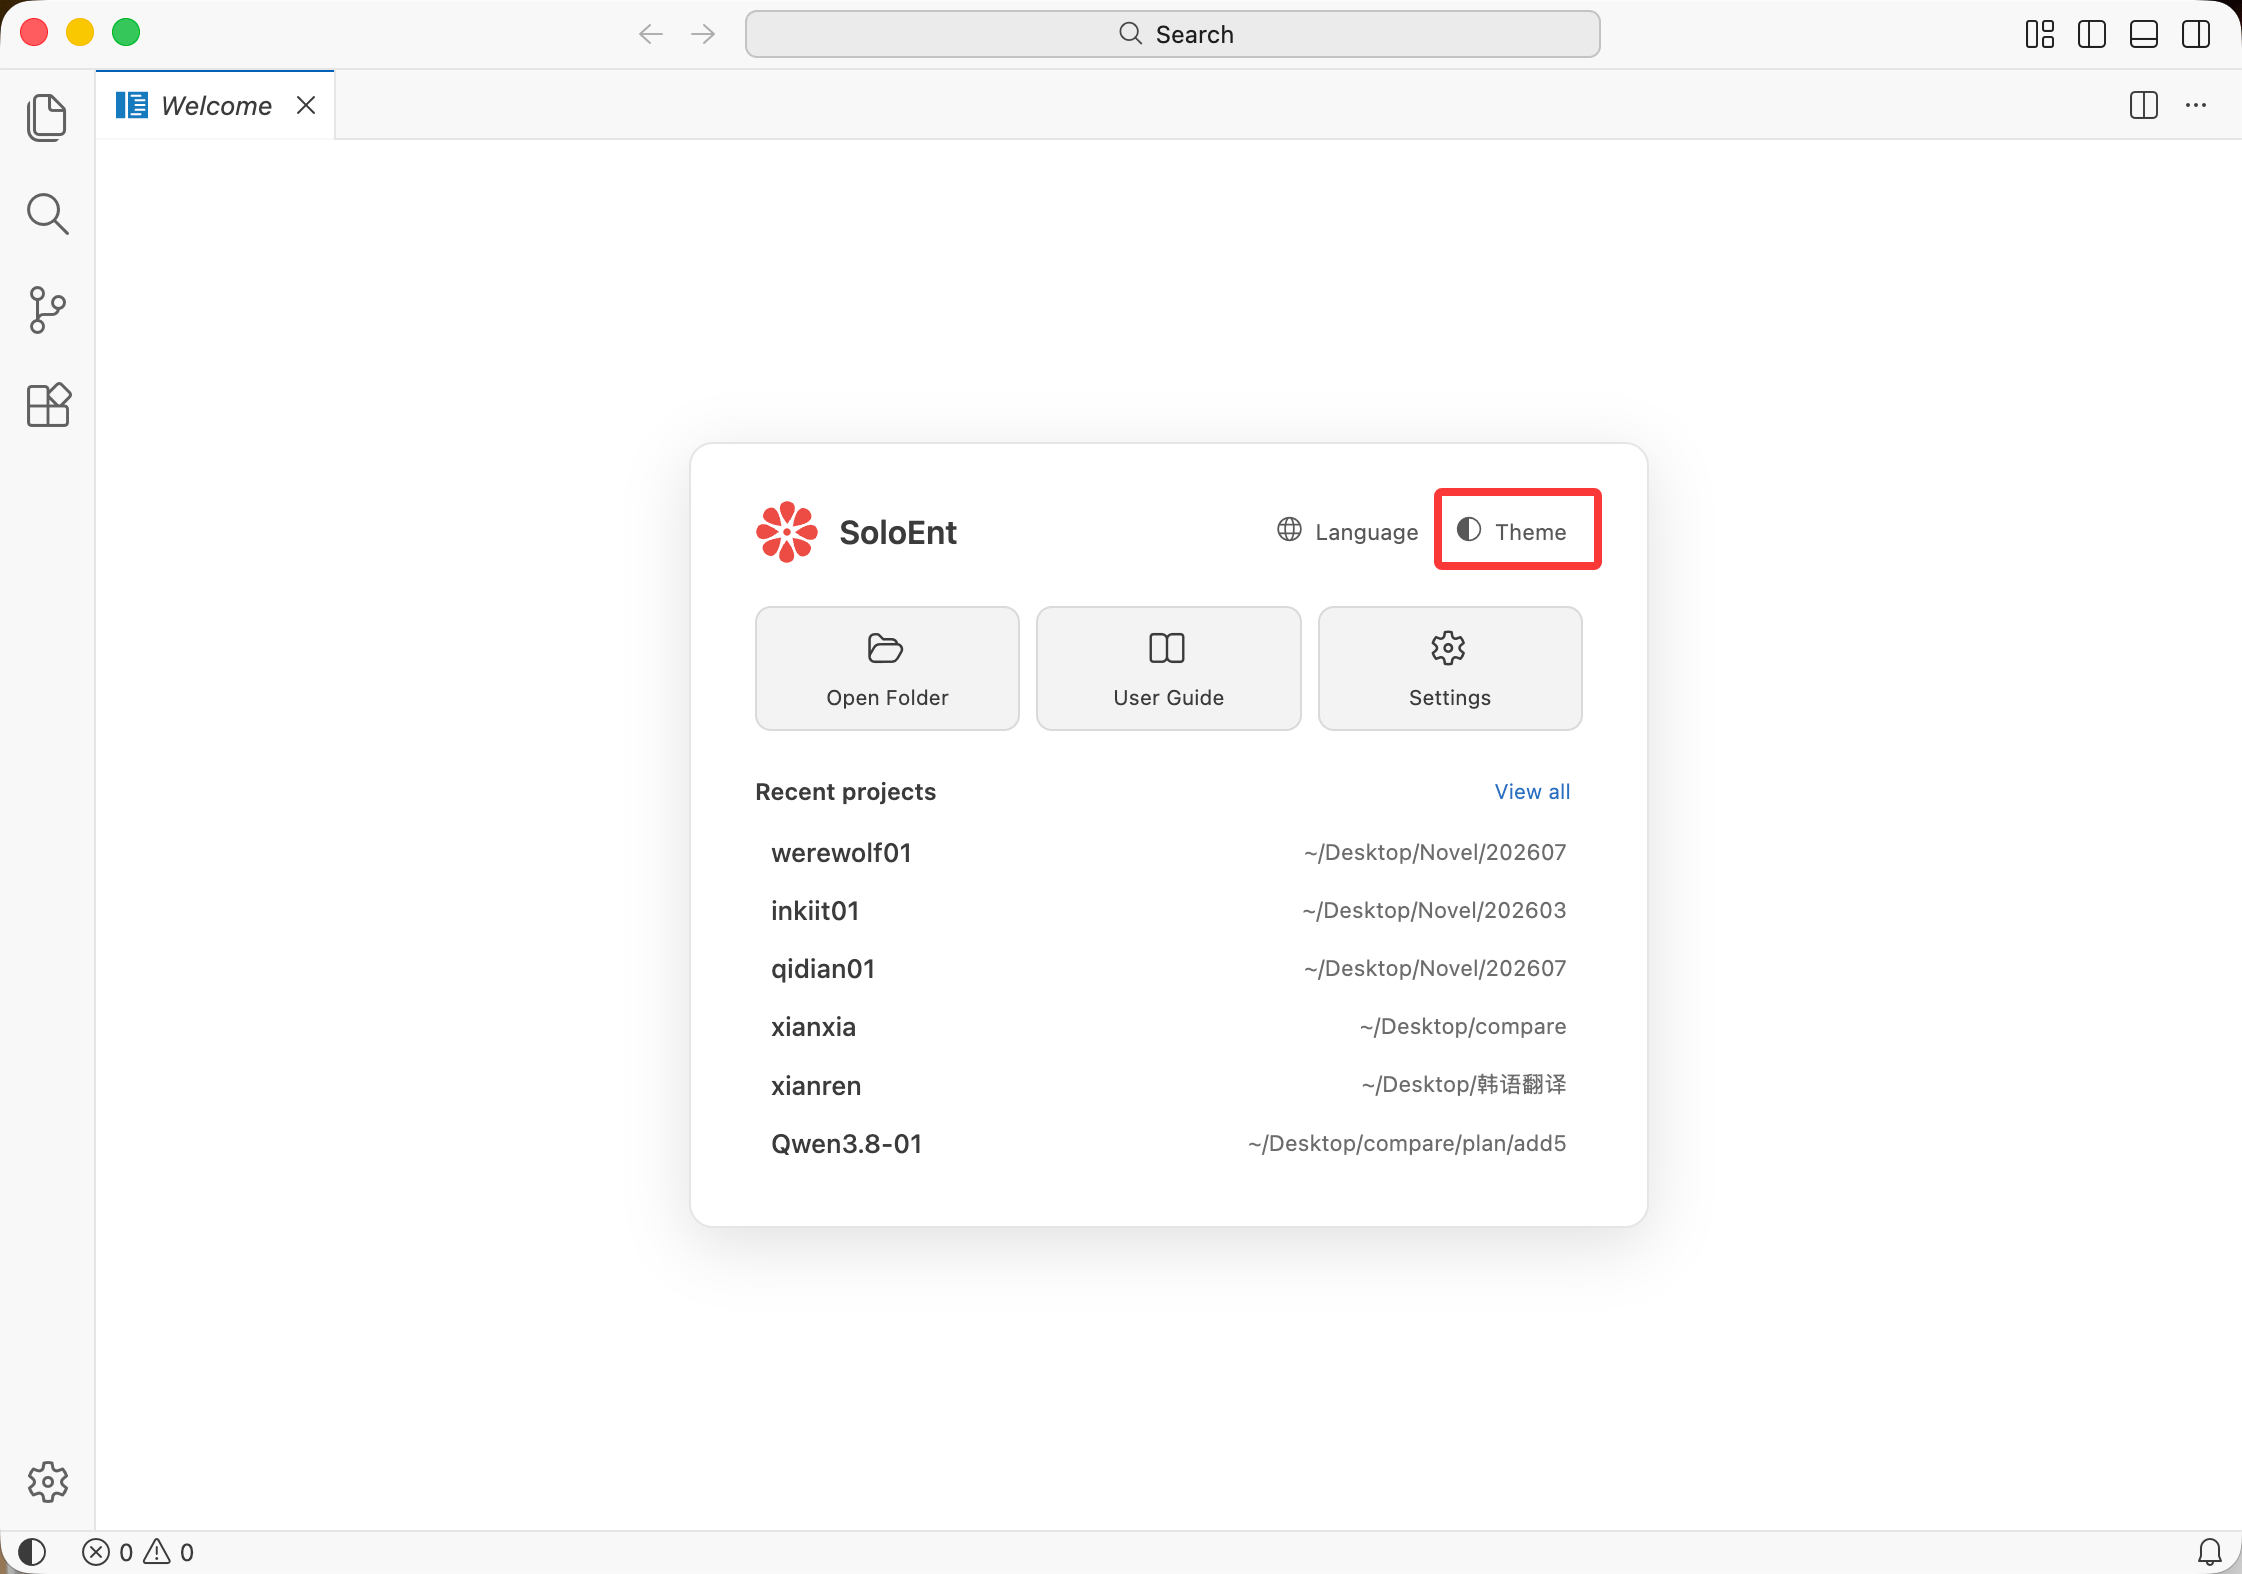 In the theme picker, use the **arrow keys to preview themes live** and press **Enter** to confirm.
 ## Step 5: Open or create a project
**In SoloEnt, one work equals one folder** stored locally on your machine. The first thing to do after launching the app is open a folder.
### Open an existing project
Select the project folder and click **Open**.
Open the **folder**, not a single file. Opening a single file leaves the Agent without project context.
### Create a new project
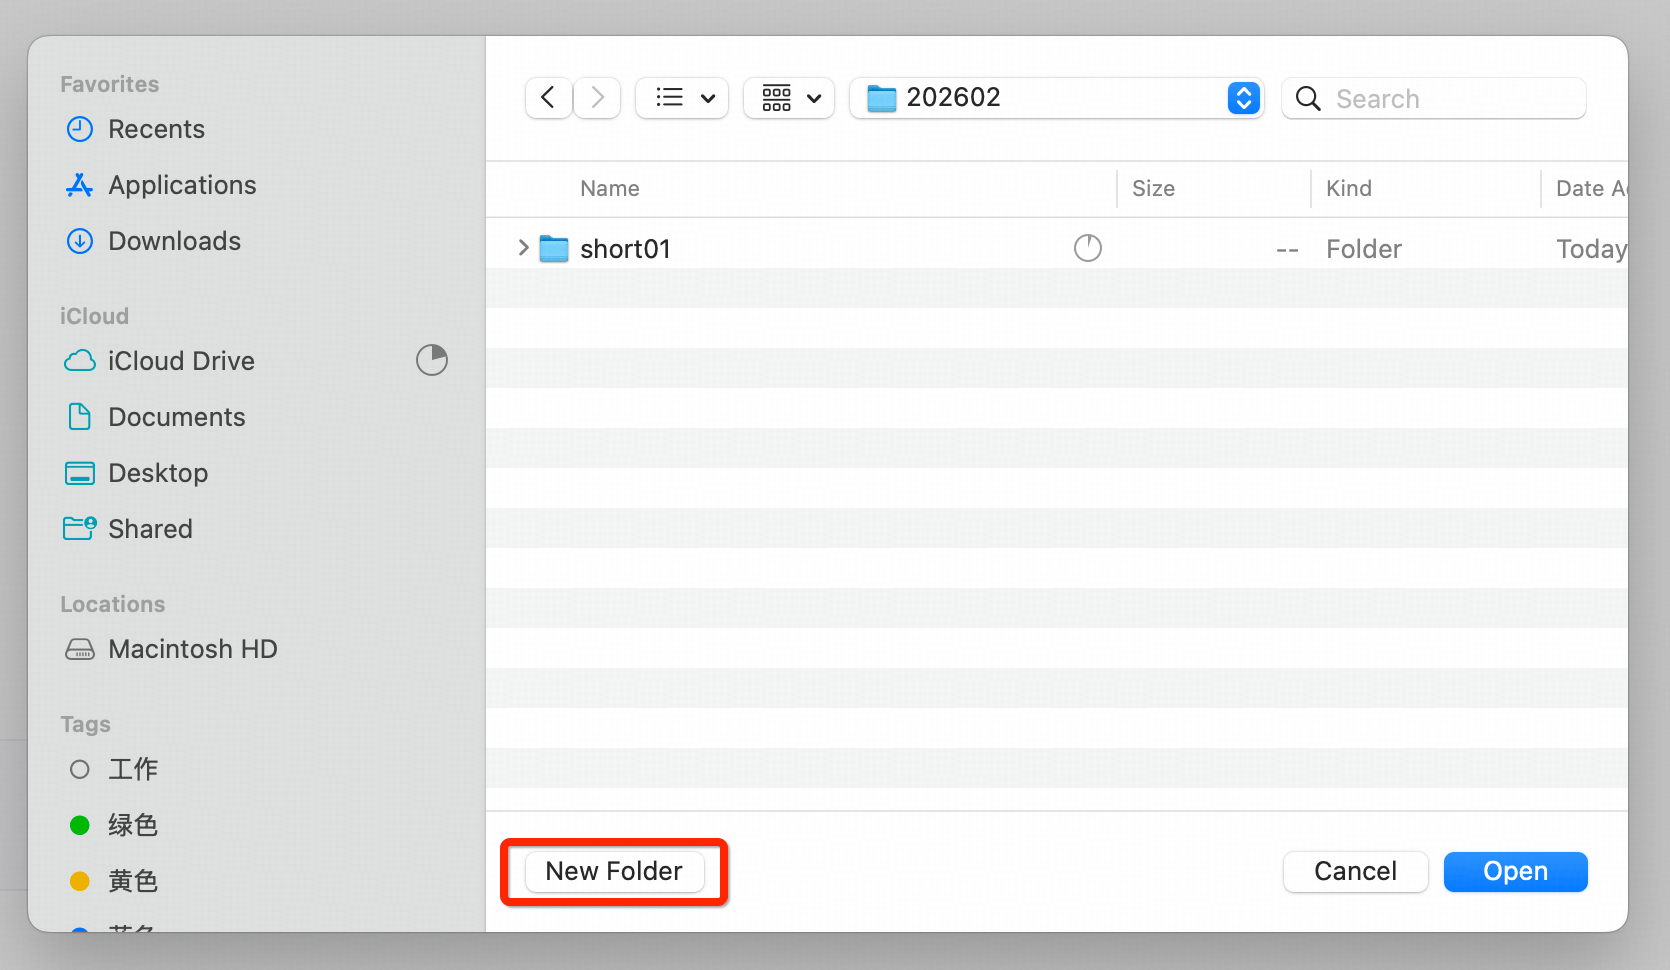
In the file picker, navigate to where you want the work to live, click **New Folder** in the bottom-left, then open it.
## Step 5: Open or create a project
**In SoloEnt, one work equals one folder** stored locally on your machine. The first thing to do after launching the app is open a folder.
### Open an existing project
Select the project folder and click **Open**.
Open the **folder**, not a single file. Opening a single file leaves the Agent without project context.
### Create a new project
In the file picker, navigate to where you want the work to live, click **New Folder** in the bottom-left, then open it.
 Once it is open, the Agent will look for and create files in that folder as your writing requires — world, characters, outline, chapters, and so on.
## Step 6: Learn the interface
The interface has three panels, left to right. Every divider is draggable. The four icons in the top-right switch between layout presets.
Once it is open, the Agent will look for and create files in that folder as your writing requires — world, characters, outline, chapters, and so on.
## Step 6: Learn the interface
The interface has three panels, left to right. Every divider is draggable. The four icons in the top-right switch between layout presets.
 | Panel | What it does |
| ------------------- | ----------------------------------------------------------------------------------------------------------------------------------------------------------------------------- |
| Left — file manager | Manages your work: world, characters, outline, chapters, plus anything else you or the AI generate |
| Center — editor | Read and edit documents, primarily Markdown. Supports split and multi-pane views, and formatted preview |
| Right — Agent | Talk to the Agent to run writing tasks, switch between Plan and Act modes, drag files in from the left, quote selected text from the editor, and call subagents or web search |
Two habits worth forming early: **drag files into the chat box**, and **select text in the editor and quote it into the chat**. Both are cheaper in tokens and more precise than copy-paste.
## Step 7: Sign in
You need to be signed in to use the official models and your free credits.
Click the avatar in the top-right of the Agent panel, then sign in.
| Panel | What it does |
| ------------------- | ----------------------------------------------------------------------------------------------------------------------------------------------------------------------------- |
| Left — file manager | Manages your work: world, characters, outline, chapters, plus anything else you or the AI generate |
| Center — editor | Read and edit documents, primarily Markdown. Supports split and multi-pane views, and formatted preview |
| Right — Agent | Talk to the Agent to run writing tasks, switch between Plan and Act modes, drag files in from the left, quote selected text from the editor, and call subagents or web search |
Two habits worth forming early: **drag files into the chat box**, and **select text in the editor and quote it into the chat**. Both are cheaper in tokens and more precise than copy-paste.
## Step 7: Sign in
You need to be signed in to use the official models and your free credits.
Click the avatar in the top-right of the Agent panel, then sign in.
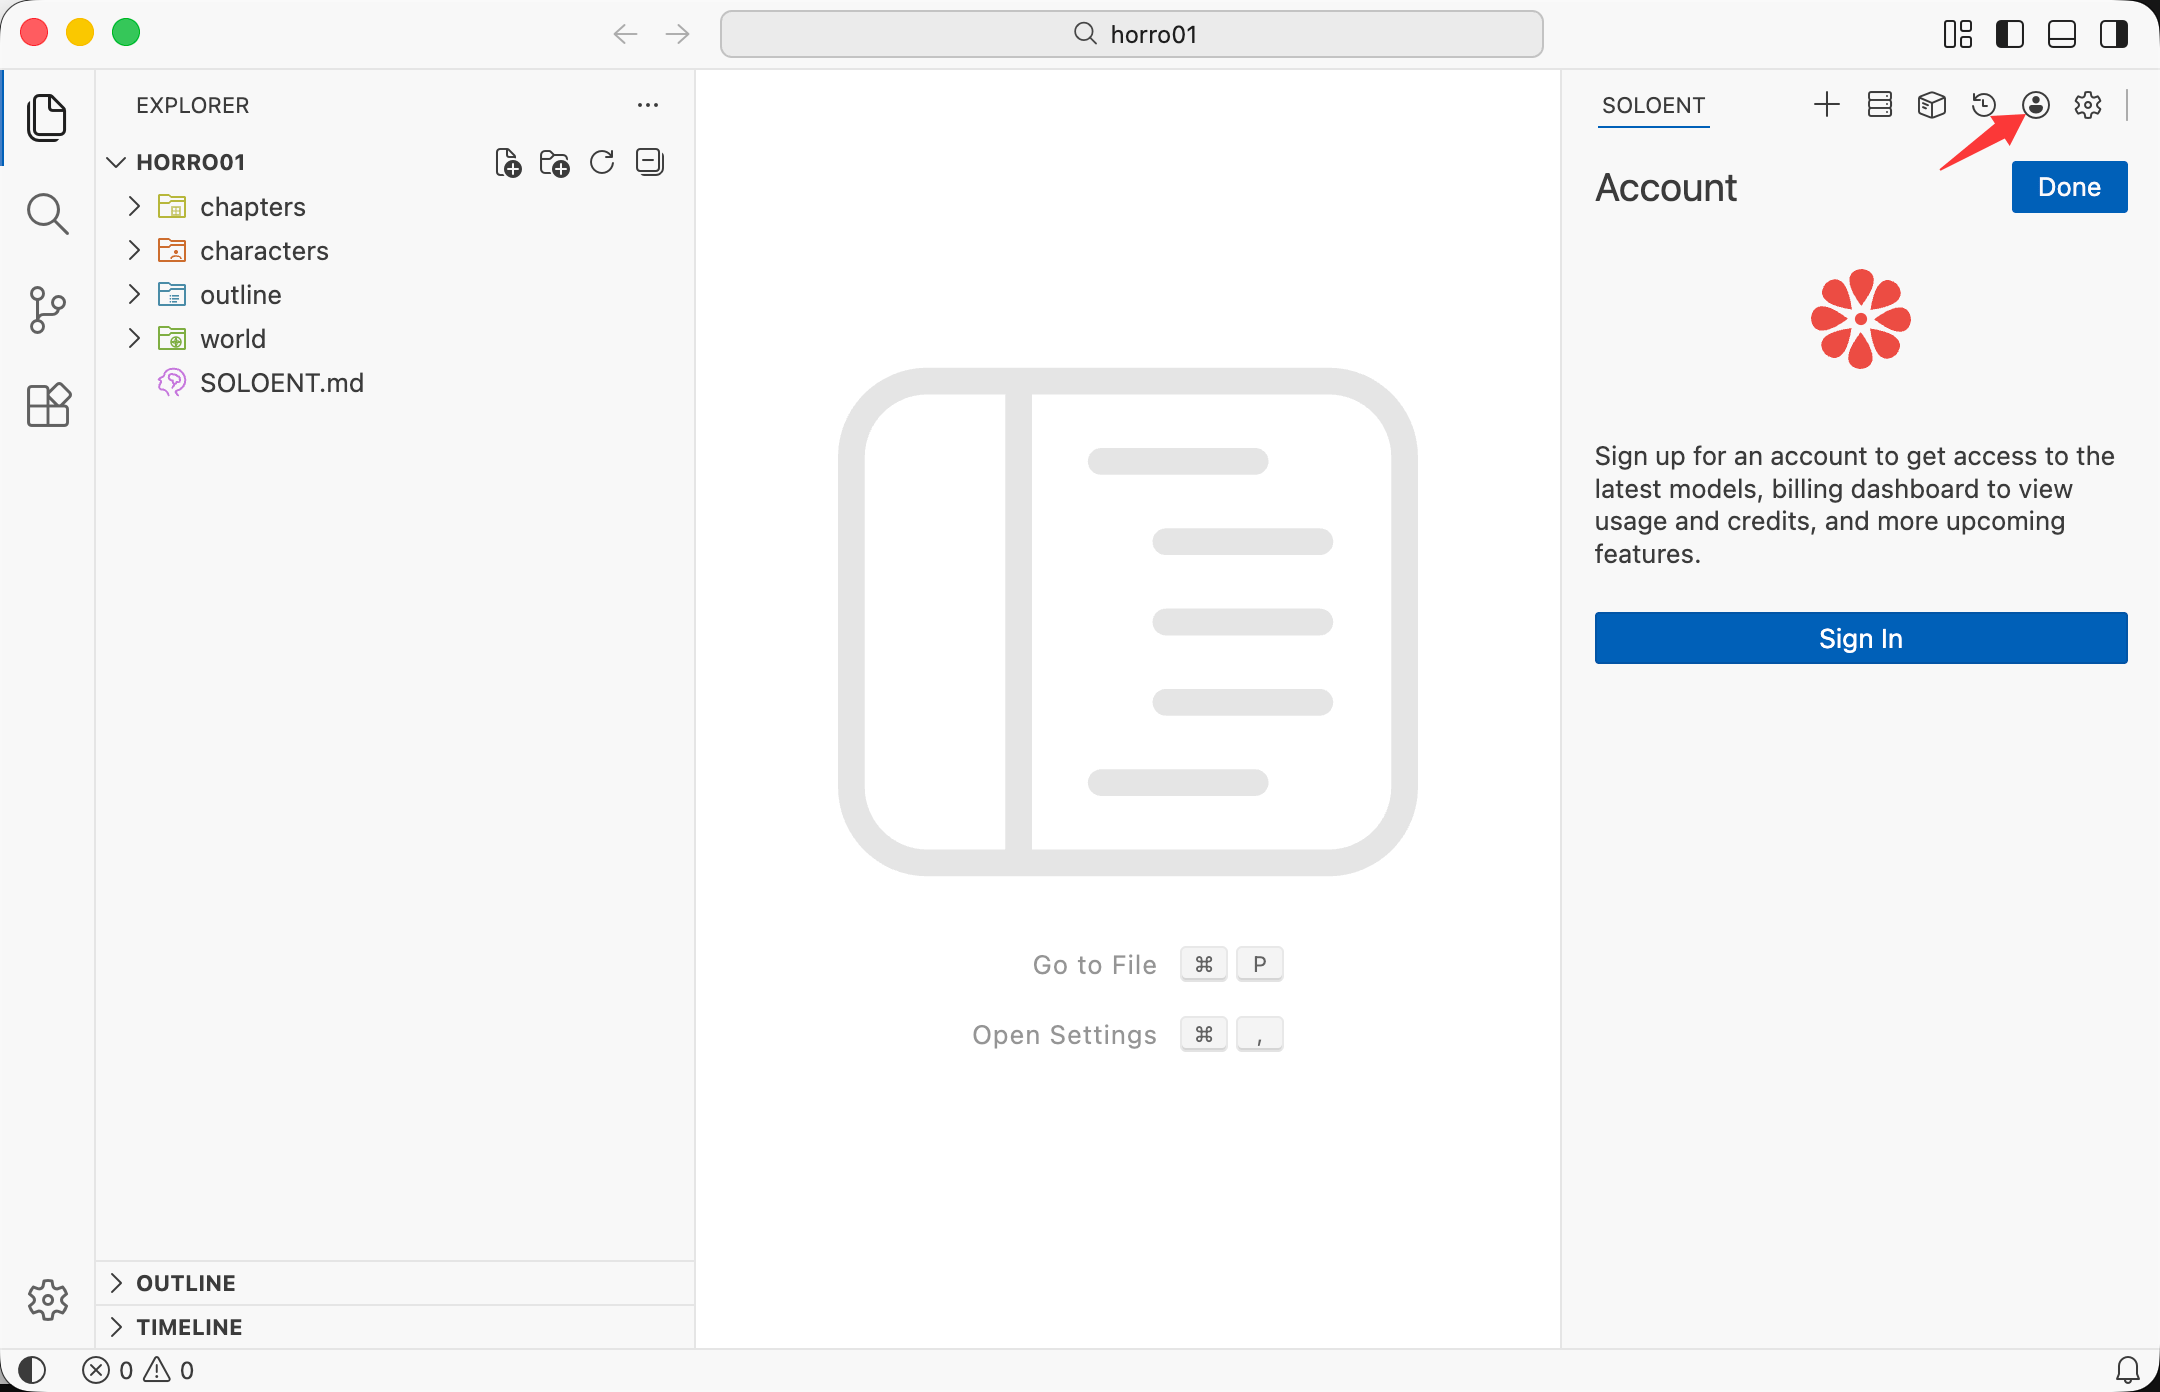 The login page opens automatically in your browser. Sign in with Google or Microsoft.
After signing in, the page asks whether to open SoloEnt. Click **Open**.
The login page opens automatically in your browser. Sign in with Google or Microsoft.
After signing in, the page asks whether to open SoloEnt. Click **Open**.
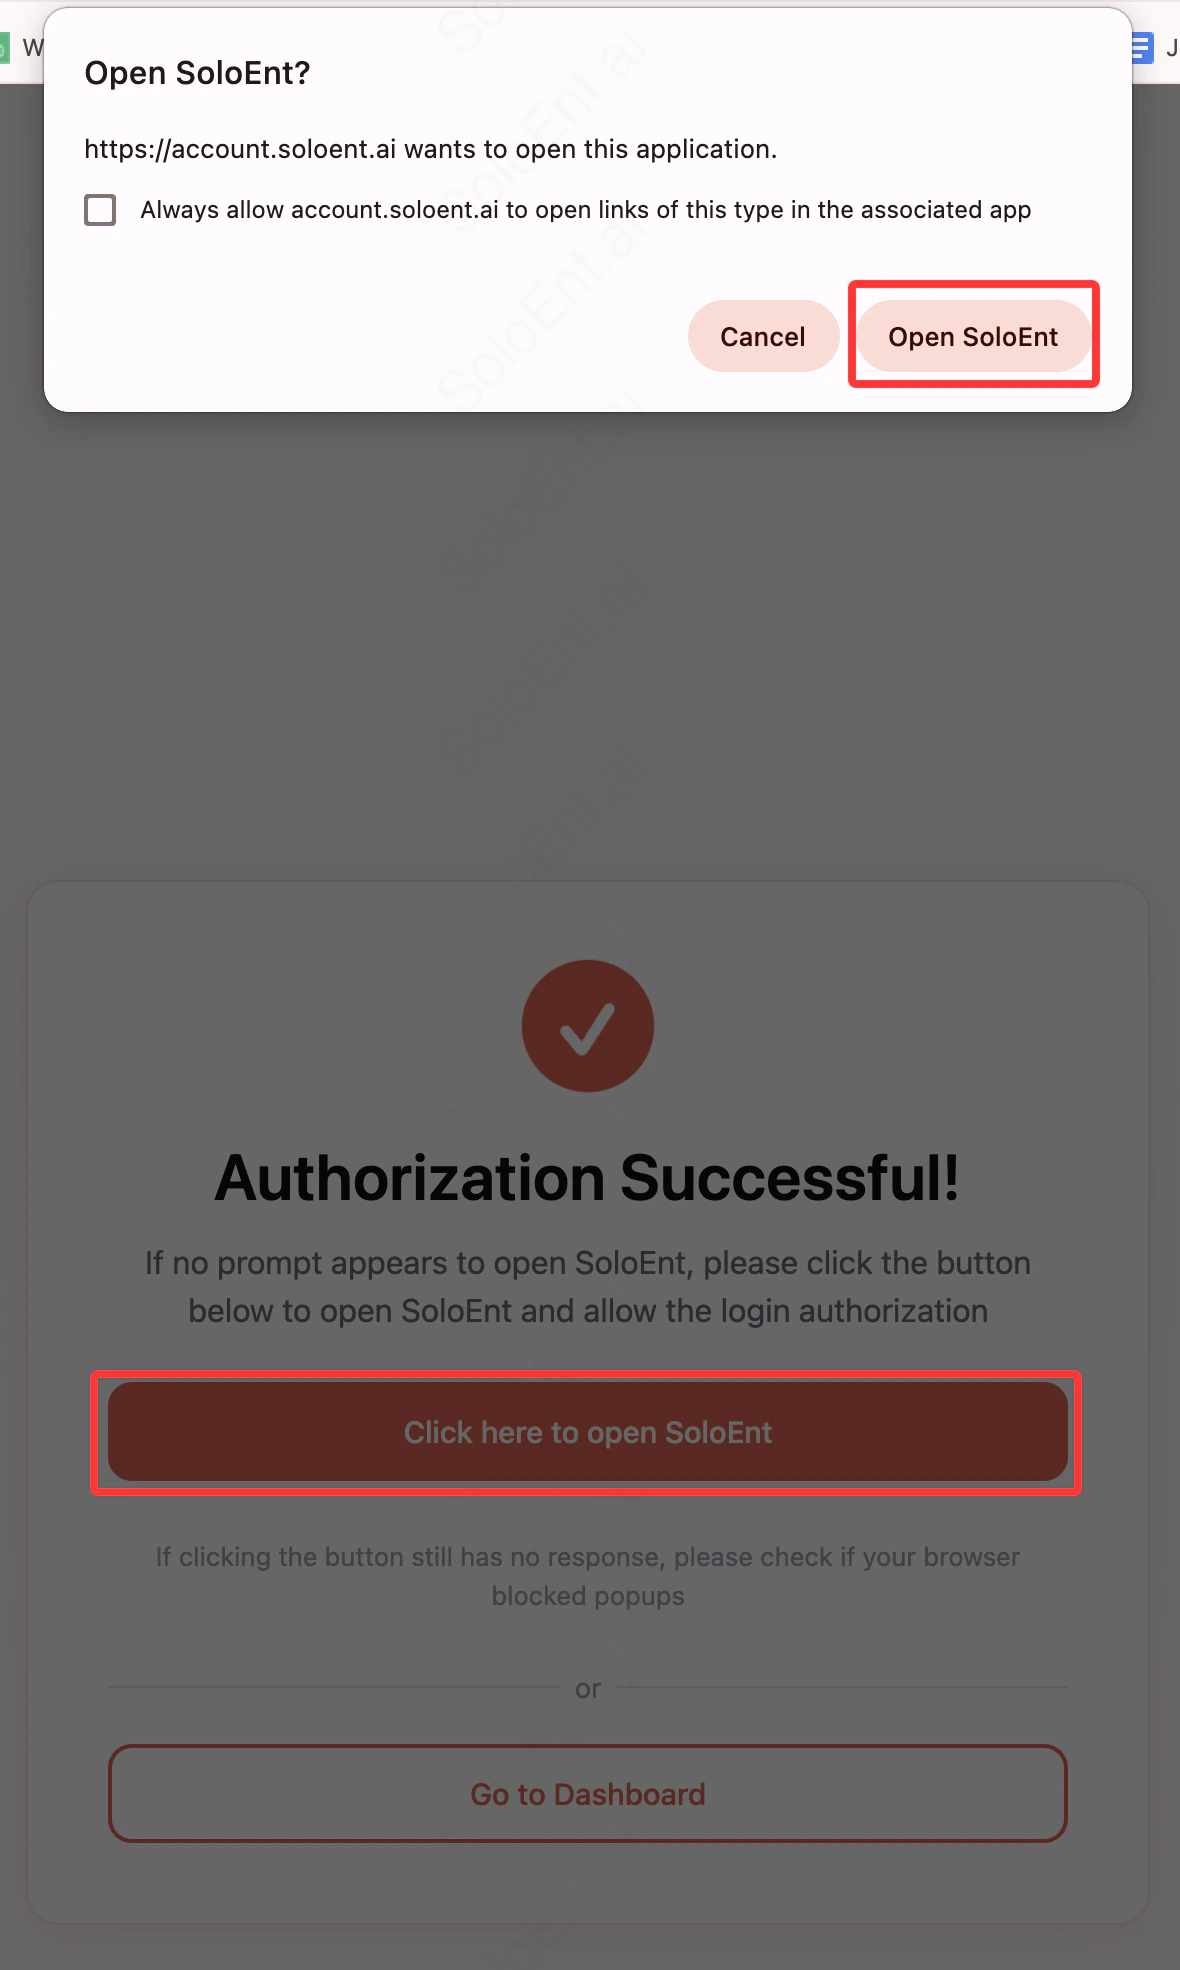 Back in the app, an authorization prompt appears. Click **Open** to finish.
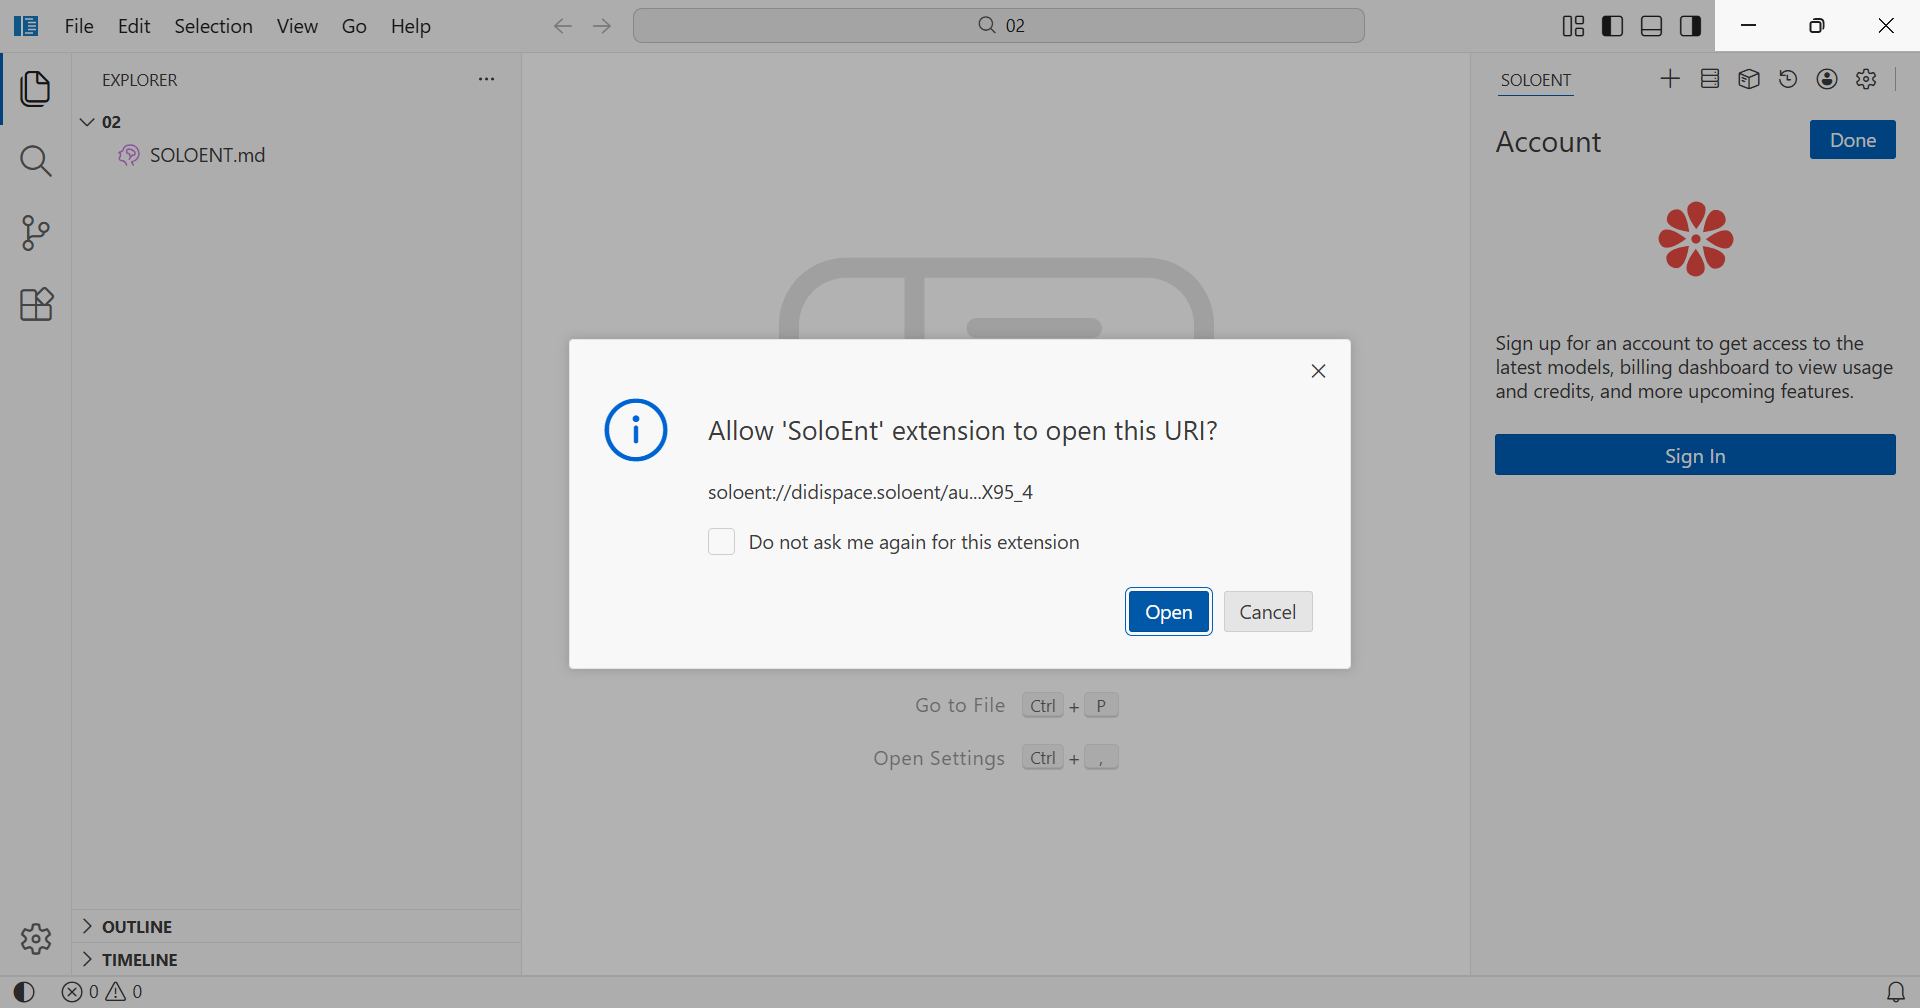 After your first successful third-party sign-in, you can set an email and password in the dashboard and use those from then on.
## Step 8: Configure your API
This is where new users most often get stuck, but **most people do not need to configure anything** — sign in and the free official models are ready to use.
### Two ways in
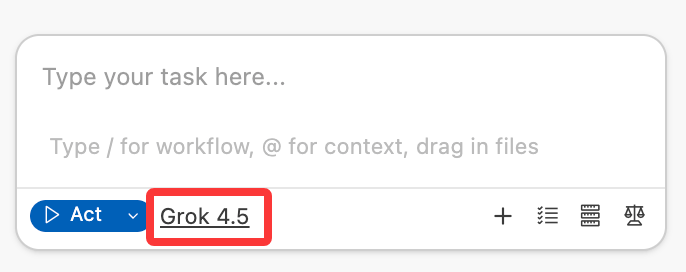
* **Quick** — click the model name at the bottom of the Agent chat box to open the model settings directly
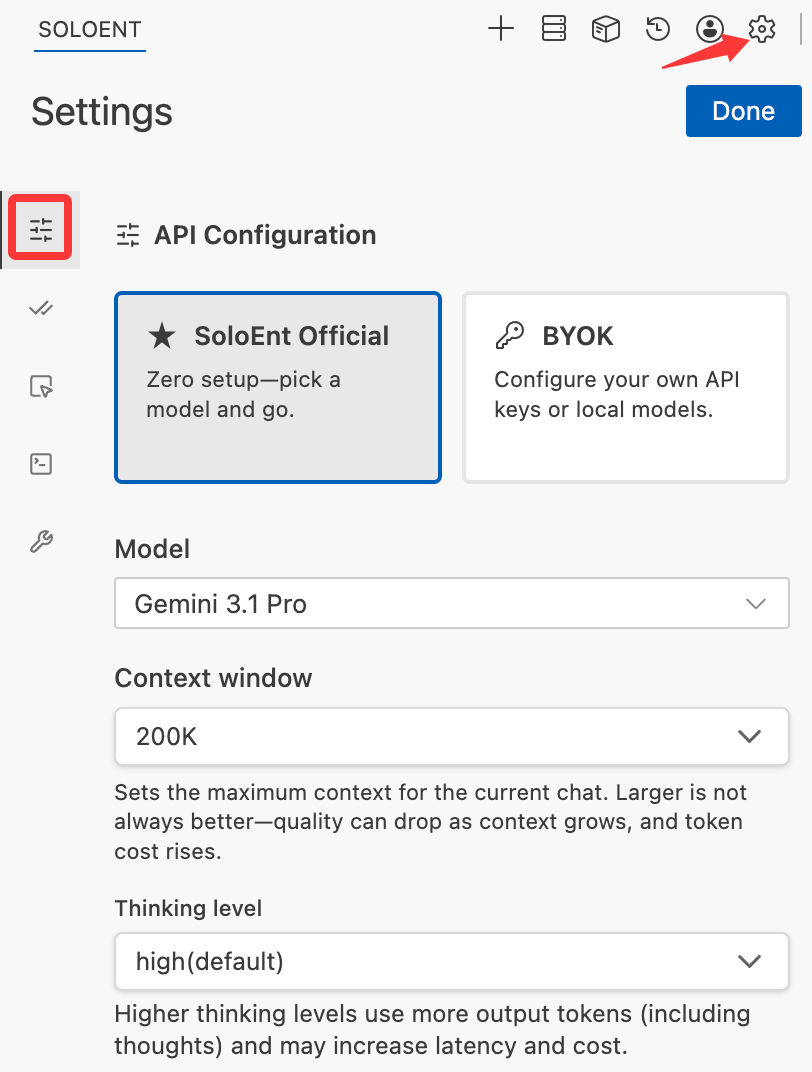
* **Full** — click the settings icon in the Agent panel and go to API Configuration
The configuration page has two columns: **Official** (no setup, just pick a model) and **BYOK** (bring your own API key or a local model).
After your first successful third-party sign-in, you can set an email and password in the dashboard and use those from then on.
## Step 8: Configure your API
This is where new users most often get stuck, but **most people do not need to configure anything** — sign in and the free official models are ready to use.
### Two ways in
* **Quick** — click the model name at the bottom of the Agent chat box to open the model settings directly
* **Full** — click the settings icon in the Agent panel and go to API Configuration
The configuration page has two columns: **Official** (no setup, just pick a model) and **BYOK** (bring your own API key or a local model).
 ### Option A: Use the official API (recommended for beginners)
**No configuration needed. Sign in and go.**
* Free models are provided, and every registered user gets **US\$0.5** in trial credit
* More free credit is available through platform activities
* The free model list and any discounts change with ongoing promotions
* Lite, Pro, and Max subscribers get every model in the VIP list, always the latest official releases. Membership switches you to the VIP list automatically
* Official API pricing matches each model vendor's own pricing, with **no surcharge**
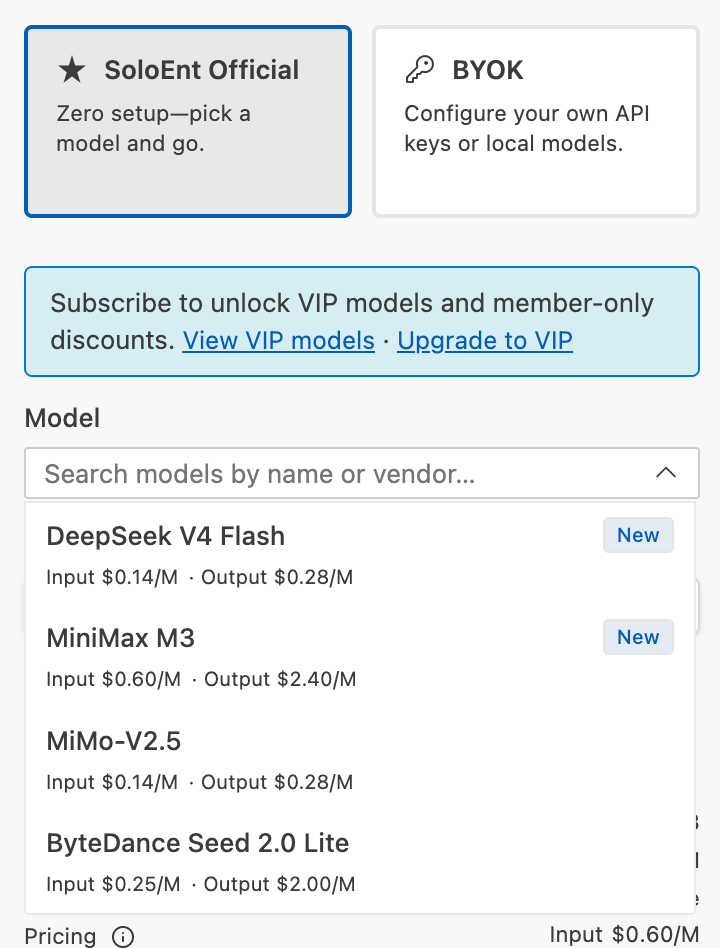
You can search the model list by name or vendor. Each model shows its context length and input/output pricing.
### Option A: Use the official API (recommended for beginners)
**No configuration needed. Sign in and go.**
* Free models are provided, and every registered user gets **US\$0.5** in trial credit
* More free credit is available through platform activities
* The free model list and any discounts change with ongoing promotions
* Lite, Pro, and Max subscribers get every model in the VIP list, always the latest official releases. Membership switches you to the VIP list automatically
* Official API pricing matches each model vendor's own pricing, with **no surcharge**
You can search the model list by name or vendor. Each model shows its context length and input/output pricing.
 ### Option B: Bring your own third-party API key (BYOK)
First, one thing to be clear about: **an API key is not the same as a subscription on the model vendor's website.**
Many people assume a US\$20 monthly plan on a vendor's site includes API access. It does not — the two are billed separately. An API key is:
* Your credential for calling the model
* The thing your usage is billed against
* A secret worth protecting. It looks like `sk-abc123xyz456...` — never share it, never commit it to a public repository
To configure:
Choose BYOK on the configuration page.
Select your provider from the dropdown.
Fill in the values your provider gave you.
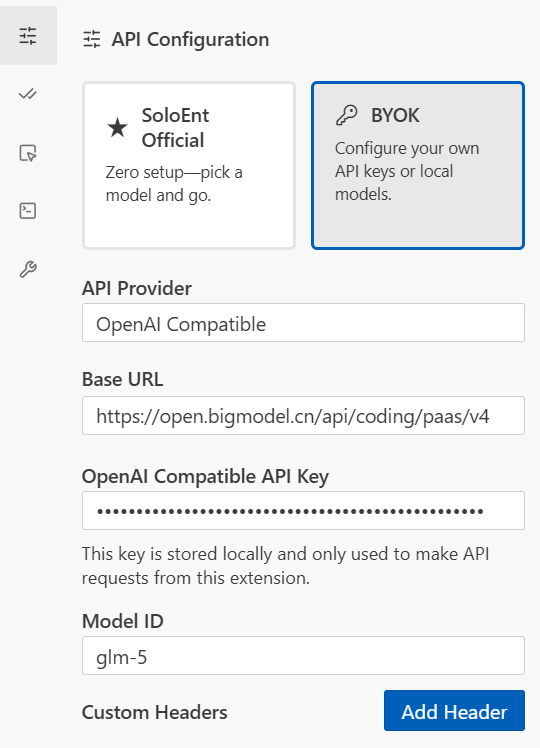
Only keys bought directly from a model vendor, and a small number of aggregators, can be configured by picking a provider. **Most third-party providers require the OpenAI Compatible option, which needs Base URL, API Key, and Model ID — all three.** Confirm those three values with your provider before you buy.
### Option B: Bring your own third-party API key (BYOK)
First, one thing to be clear about: **an API key is not the same as a subscription on the model vendor's website.**
Many people assume a US\$20 monthly plan on a vendor's site includes API access. It does not — the two are billed separately. An API key is:
* Your credential for calling the model
* The thing your usage is billed against
* A secret worth protecting. It looks like `sk-abc123xyz456...` — never share it, never commit it to a public repository
To configure:
Choose BYOK on the configuration page.
Select your provider from the dropdown.
Fill in the values your provider gave you.
Only keys bought directly from a model vendor, and a small number of aggregators, can be configured by picking a provider. **Most third-party providers require the OpenAI Compatible option, which needs Base URL, API Key, and Model ID — all three.** Confirm those three values with your provider before you buy.
 **Buy only from official sources, and be careful with payment details.**
### Option C: Reuse an existing Codex or Claude Code subscription
If you already pay for either one, you can spend that subscription inside SoloEnt and still get SoloEnt's writing Skills.
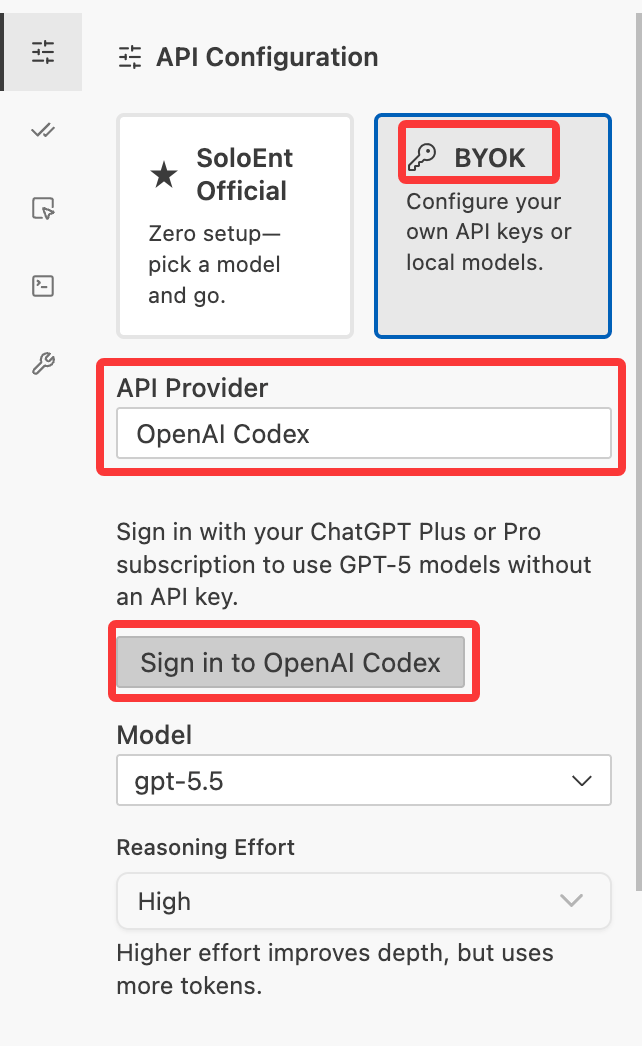
**Codex** — choose BYOK, set the provider to **OpenAI Codex**, click Sign in to OpenAI Codex, then pick a Codex model from the model list.
**Buy only from official sources, and be careful with payment details.**
### Option C: Reuse an existing Codex or Claude Code subscription
If you already pay for either one, you can spend that subscription inside SoloEnt and still get SoloEnt's writing Skills.
**Codex** — choose BYOK, set the provider to **OpenAI Codex**, click Sign in to OpenAI Codex, then pick a Codex model from the model list.
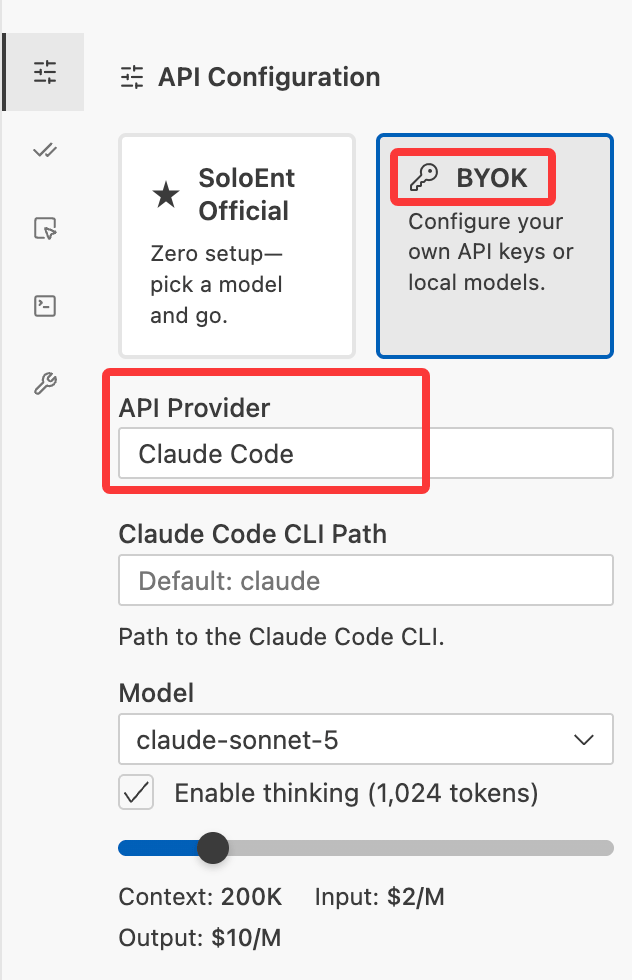
 **Claude Code** — install the Claude Code CLI locally and sign it into your subscription first. Then choose BYOK, set the provider to **Claude Code**, and pick the Claude model you want. No other setup is needed.
 ### Advanced: different models for Plan and Act
Official models can be assigned separately to planning and execution:
* Planning rewards structure and good clarifying questions — Sonnet and GLM do well here
* Execution rewards speed, concision, or lower cost — Gemini and Doubao do well here
### Advanced: different models for Plan and Act
Official models can be assigned separately to planning and execution:
* Planning rewards structure and good clarifying questions — Sonnet and GLM do well here
* Execution rewards speed, concision, or lower cost — Gemini and Doubao do well here
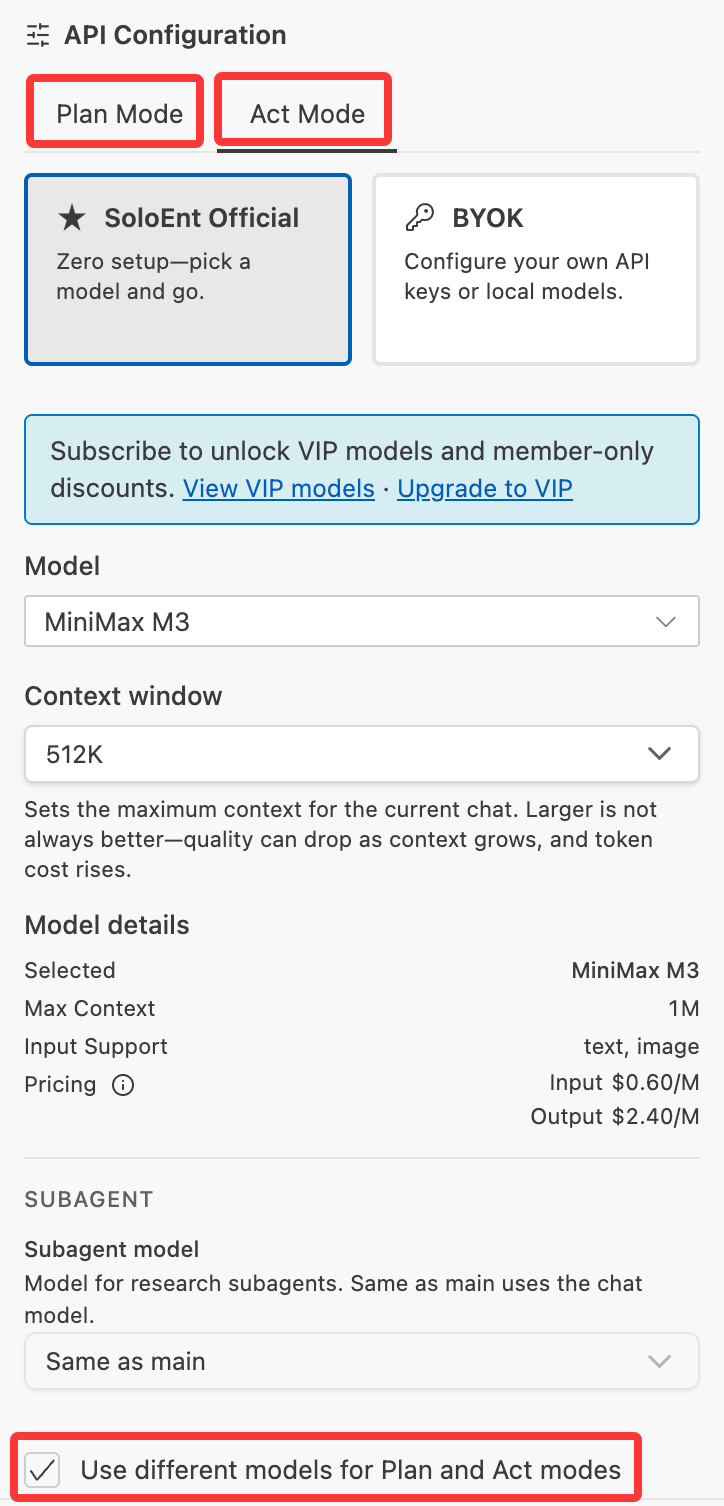 This is optional. It suits users with a strong feel for individual models — if you are new, leave the defaults alone.
## Step 9: Install your first plugin
Plugins are how SoloEnt's writing capabilities are distributed. A plugin may contain a Rule, a Workflow, a Skill, or any combination, aimed at one specific writing scenario. **You never have to create configuration files by hand — install it and follow its instructions.**
You can browse everything published at [soloent.ai/en/plugins](https://soloent.ai/en/plugins).
### Open a project first (this matters)
Plugins install into **the currently active project**, not a global directory. Open the writing project you want to use it in (Step 5) before installing. Installing with no project open puts the files in the wrong place.
### Open the Marketplace
Click the Marketplace icon (the cube) at the top of the Agent panel.
This is optional. It suits users with a strong feel for individual models — if you are new, leave the defaults alone.
## Step 9: Install your first plugin
Plugins are how SoloEnt's writing capabilities are distributed. A plugin may contain a Rule, a Workflow, a Skill, or any combination, aimed at one specific writing scenario. **You never have to create configuration files by hand — install it and follow its instructions.**
You can browse everything published at [soloent.ai/en/plugins](https://soloent.ai/en/plugins).
### Open a project first (this matters)
Plugins install into **the currently active project**, not a global directory. Open the writing project you want to use it in (Step 5) before installing. Installing with no project open puts the files in the wrong place.
### Open the Marketplace
Click the Marketplace icon (the cube) at the top of the Agent panel.
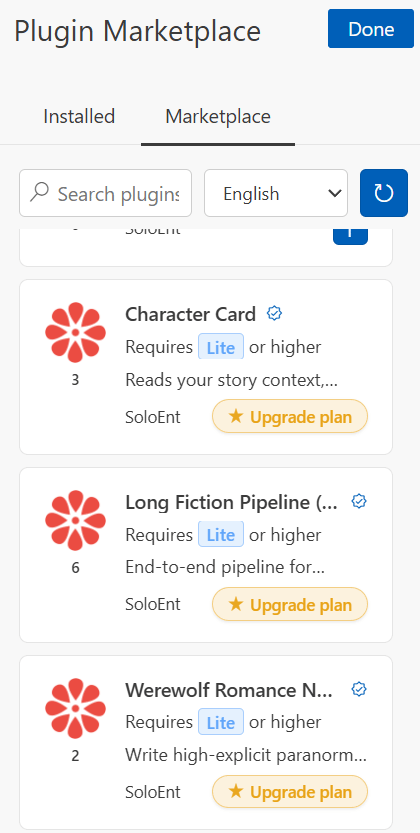 Two ways to browse:
* Type a keyword in the search bar
* Use the language filter in the top-right (English, 中文, 日本語, 한국어, Español)
### Read the detail page
Open a plugin to see its detail page. The things worth reading:
* **Name and summary** — one or two sentences on the problem it solves
* **Install count** — a rough signal of how well it works
* **Usage** — how to invoke or trigger it
* **Contents** — which of Rule / Workflow / Skill it includes
* **Core rules** — the logic behind it, at a glance
* **Version** — the currently available version
### Install and verify
Click **Install** on the detail page. Installed plugins appear under the **Installed** tab.
Depending on what the plugin contains, verify the files landed:
| Contents | Where to check |
| -------- | -------------------------- |
| Rule | Agent panel → Rules tab |
| Workflow | Agent panel → Workflow tab |
| Skill | Agent panel → Skills tab |
A combined plugin will show up in more than one place.
### Start using it
The three content types are triggered differently:
* **Rule** — active as soon as it is installed, nothing to call
* **Workflow** — triggered by its command
* **Skill** — triggered automatically when the situation calls for it
Every plugin's detail page documents its trigger, its prerequisites (for example, having a chapter file open), and what it produces. **Read that page fully before you start.**
## After that: three things worth doing immediately
### 1. Understand Plan mode vs Act mode
Switch between them in the bottom-left of the Agent chat box.
Two ways to browse:
* Type a keyword in the search bar
* Use the language filter in the top-right (English, 中文, 日本語, 한국어, Español)
### Read the detail page
Open a plugin to see its detail page. The things worth reading:
* **Name and summary** — one or two sentences on the problem it solves
* **Install count** — a rough signal of how well it works
* **Usage** — how to invoke or trigger it
* **Contents** — which of Rule / Workflow / Skill it includes
* **Core rules** — the logic behind it, at a glance
* **Version** — the currently available version
### Install and verify
Click **Install** on the detail page. Installed plugins appear under the **Installed** tab.
Depending on what the plugin contains, verify the files landed:
| Contents | Where to check |
| -------- | -------------------------- |
| Rule | Agent panel → Rules tab |
| Workflow | Agent panel → Workflow tab |
| Skill | Agent panel → Skills tab |
A combined plugin will show up in more than one place.
### Start using it
The three content types are triggered differently:
* **Rule** — active as soon as it is installed, nothing to call
* **Workflow** — triggered by its command
* **Skill** — triggered automatically when the situation calls for it
Every plugin's detail page documents its trigger, its prerequisites (for example, having a chapter file open), and what it produces. **Read that page fully before you start.**
## After that: three things worth doing immediately
### 1. Understand Plan mode vs Act mode
Switch between them in the bottom-left of the Agent chat box.
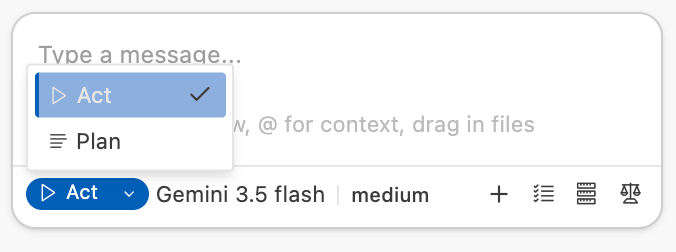 * **Plan** — produces a proposal without touching files. Use it when starting a book, when you are stuck, or when restructuring. It analyzes, breaks the work into steps, and asks for confirmation, ending with a plan you have approved.
* **Act** — does the work: creates files, edits text, runs commands. Day-to-day writing stays in Act.
If the Agent only gives opinions and never generates files, check whether you are still in Plan mode.
A good rhythm: start a new project in Plan, switch to Act once the plan is agreed, and go back to Plan when you are stuck or making a large change.
### 2. Initialize SOLOENT.md
Type `/init` in the chat and SoloEnt generates a `SOLOENT.md` for the current project. It is the project's control panel and the AI's long-term memory, covering eight sections: project DNA, world system, characters, plot and structure, style guide, constraints and taboos, live writing state, and roadmap.
It exists to solve consistency over long works. **Short projects and non-fiction do not need it.**
As you write, the Agent maintains the live writing state and roadmap sections on its own. The two you should edit by hand are the style guide and the constraints.
### 3. Where to get help
Answers to the most common questions
Login, API, file format, and environment issues
[support@soloent.cn](mailto:support@soloent.cn)
Plans, checkout, and managing your subscription
* **Plan** — produces a proposal without touching files. Use it when starting a book, when you are stuck, or when restructuring. It analyzes, breaks the work into steps, and asks for confirmation, ending with a plan you have approved.
* **Act** — does the work: creates files, edits text, runs commands. Day-to-day writing stays in Act.
If the Agent only gives opinions and never generates files, check whether you are still in Plan mode.
A good rhythm: start a new project in Plan, switch to Act once the plan is agreed, and go back to Plan when you are stuck or making a large change.
### 2. Initialize SOLOENT.md
Type `/init` in the chat and SoloEnt generates a `SOLOENT.md` for the current project. It is the project's control panel and the AI's long-term memory, covering eight sections: project DNA, world system, characters, plot and structure, style guide, constraints and taboos, live writing state, and roadmap.
It exists to solve consistency over long works. **Short projects and non-fiction do not need it.**
As you write, the Agent maintains the live writing state and roadmap sections on its own. The two you should edit by hand are the style guide and the constraints.
### 3. Where to get help
Answers to the most common questions
Login, API, file format, and environment issues
[support@soloent.cn](mailto:support@soloent.cn)
Plans, checkout, and managing your subscription